




Hands-on walkthrough
By the end of this walkthrough you will have opened, protected and closed one complete trade on BTC/USDT in the Fundex24 practice terminal. Keep the terminal open next to it: it shows how to trade on a demo account the way you would trade real money, sizing from risk and setting the stop loss before you think about profit.
What do you need before your first demo trade?
You need an open Fundex24 practice account with its $10,000 virtual balance and the BTC/USDT practice terminal on screen. If you have not set the account up yet, the guide to the crypto demo account walks through it; the terminal opens on BTC/USDT by default.
Take a minute to find four things before you touch the order panel: the chart, the side choice (Long or Short), the Order Type choice and the Leverage setting. Once a position is open, the terminal lists it with its Unrealized PnL, and your Equity starts changing as price moves.
Pick BTC/USDT for the first trade even if a meme coin looks more exciting. It moves enough to show you profit and loss in real time, but its swings are calmer, so a first mistake stays small and easy to read.
Long or short: which way are you trading?
Go long when you expect the price to rise and short when you expect it to fall. Both are one click apart in the terminal, and neither requires owning any bitcoin.
- Long: you open a $5,000 long and BTC rises 3%. The position is up about $150.
- Short: you open a $5,000 short and BTC falls 3%. The position is also up about $150.
The mirror image holds for losses: a long loses when price drops, a short loses when it climbs. Beginners often avoid shorts because selling something you do not own feels odd. On a perpetual-futures style position there is nothing to borrow or deliver; you are simply taking the other side of the price move, so practise both directions early.
Market, limit or stop: which order type should you use?
Use a market order when you want in right now, a limit order when you want a better price than the current one, and a stop entry when you only want in once price breaks through a level. The Order Type choice in the terminal switches between Market, Limit and Stop.
- Market fills straight away at the current price. Simple, but you accept whatever price is there.
- Limit waits for price to come to you: a long limit sits below the current price, a short limit above it.
- Stop entry waits for price to move through a level first: a long stop sits above the current price, useful when you want confirmation of a breakout.
For this first trade a market order is fine, because the goal is to go through the full cycle once. Later in the session, place one limit or stop entry as well. Pending orders are one of the six practice milestones, and they teach patience: you decide the price in advance instead of chasing a candle.
What does leverage actually change?
Leverage changes how much margin a position locks up, not how much you lose when your stop is hit. On the Fundex24 practice account you can use up to 1:10, and every position uses isolated margin.
With isolated margin, each position has its own margin set aside, and the terminal closes the position before the loss can exceed that margin. The rest of your balance is not pulled in to keep a losing trade alive.
Create your Fundex24 account
Takes a few seconds. You can pick a challenge and add your phone number later.
Here is the part that surprises most beginners. A $5,000 position needs $1,000 of margin at 1:5 and only $500 at 1:10, yet if price moves 2% against you, both lose the same $100. Higher leverage does bring the forced close much nearer to your entry, so a trade without a stop has far less room at 1:10 than at 1:2. Start low, around 1:2 to 1:5, and let the stop loss decide your risk.
How do you size a trade on a demo account?
Start from the amount you are willing to lose, then work backwards to the position size. Choosing a size because it “feels right” is the habit that ends real accounts, and a demo is the cheapest place to replace it.
Worked example on the $10,000 virtual balance
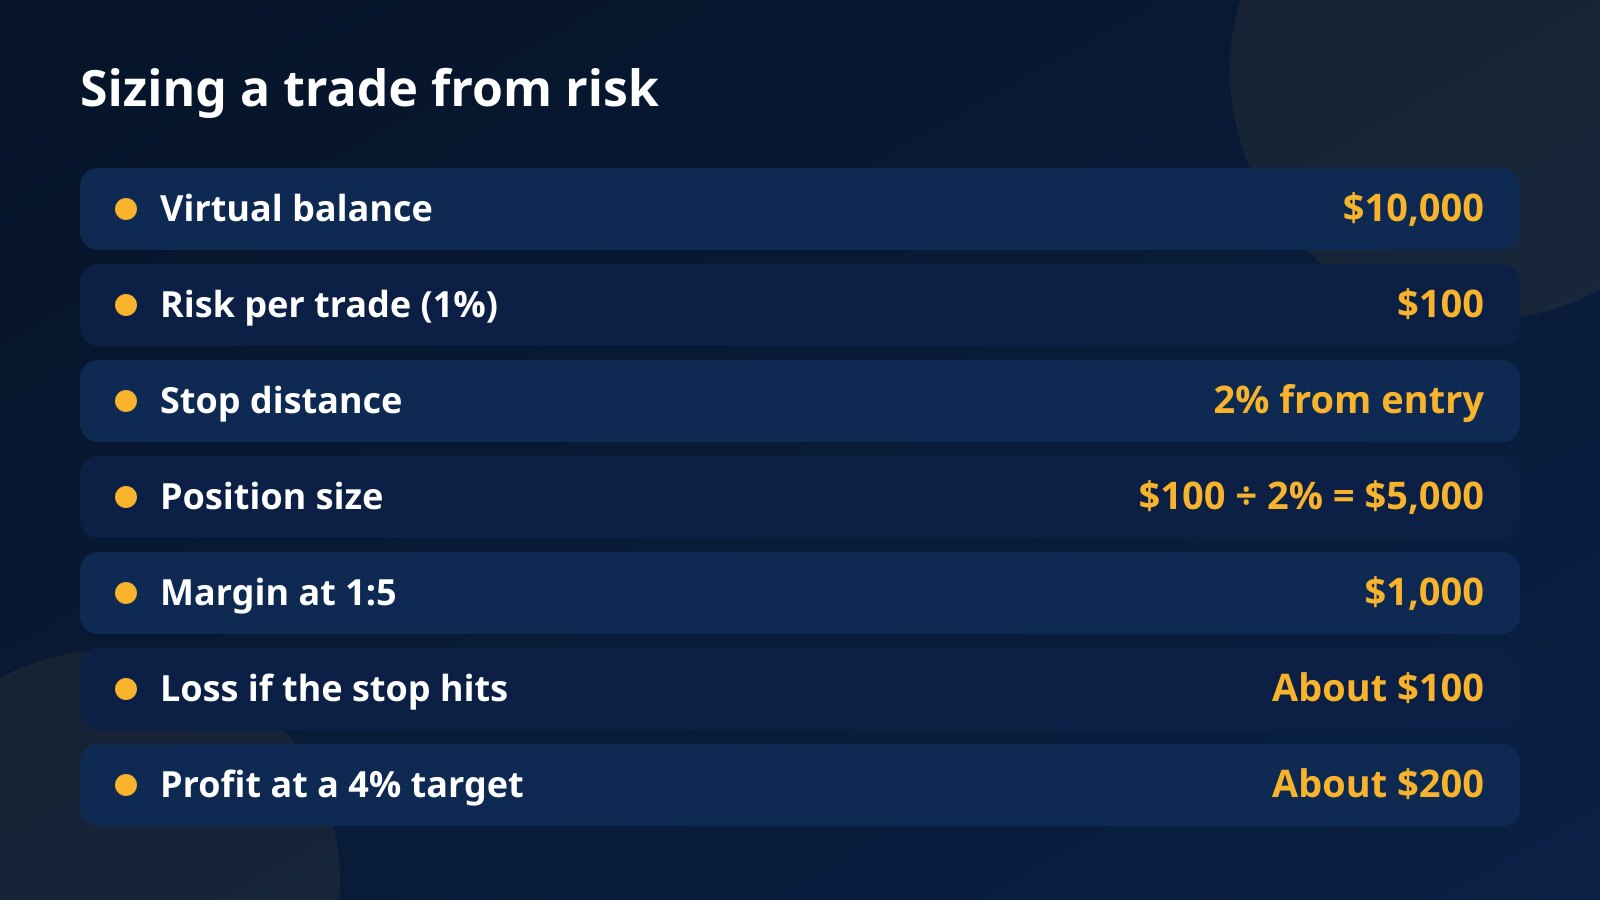
- Decide your risk per trade: 1% of $10,000 is $100.
- Find a logical stop, for example below a recent swing low. Say it sits 2% below your entry.
- Divide the risk by the stop distance: $100 divided by 2% gives a $5,000 position.
- Choose the leverage for margin, not for risk: at 1:5 the position locks $1,000 of margin.
- Check the result: if the stop is hit you lose about $100, and at a target 4% away you make about $200.
If your stop has to be wider, the position gets smaller. A stop 4% away with the same $100 risk means a $2,500 position. Before you confirm, compare the Notional and Margin figures in the order panel with your own numbers, so you know exactly what the size field is asking for.
Where do the stop loss and take profit go?
Set both before you enter or straight after, never “once the trade has room”. The terminal does not force a stop loss on you, which is exactly why the habit is worth building now.
For a long, the stop loss goes below your entry and the take profit above it; for a short it is the other way round. Fill in the TP / SL fields in the order panel before confirming, or add them to an open position with Edit TP/SL. Protecting a position with a stop loss and setting a take profit are two separate practice milestones, so this one trade ticks off both.
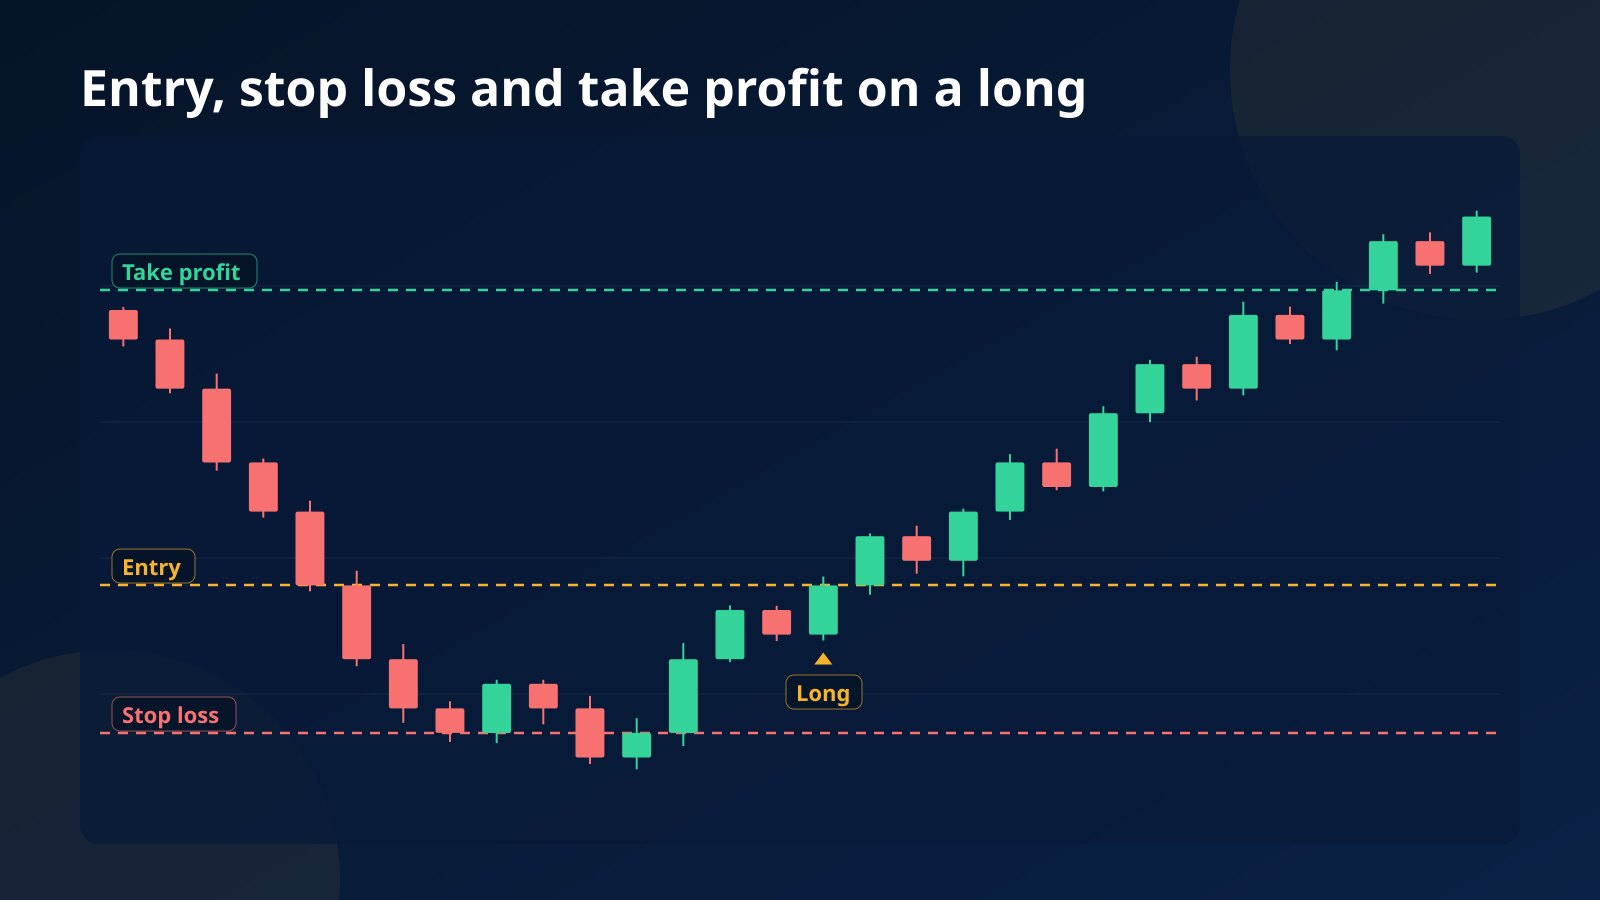
Place the stop where your trade idea is proven wrong, not at a round dollar loss you picked first. Then place the target at a level the chart gives you. If that target is closer than the stop, the trade needs to win far more often than it loses to be worth taking, so skip it or look for a better entry.
How do you watch and close the trade?
Watch equity, not balance, and close only for a reason you wrote down before entry. While the position is open your balance stays where it was; equity is your balance plus the Unrealized PnL of the open trade, and it moves with every tick.
You have three ways out. The take profit fills, the stop loss fills, or you press Close Position yourself. Closing by hand is fine when something you planned for happens, such as a sharp reversal candle at your target zone. It is a bad habit when the only reason is that the red number made you nervous.
Once the position closes, the result moves into your balance and the practice card updates its trades, win rate and net P&L. That also completes the first milestone, closing your first trade. Before opening the next one, write one line: why you entered, where the stop and target were, and whether you followed the plan.
A checklist for your next nine trades
Trading ten times is one of the six milestones, and the value lies in making the process boring. Run through this before each trade:
- Is my risk still 1% or less of the balance?
- Is the stop at a level where the idea is wrong?
- Did I size the position from the stop, not the other way round?
- Is the leverage low enough that the forced close is far beyond my stop?
- Are the stop loss and take profit in place before I look away?
- Did I write my journal line after closing?
Spread those trades over more than one day. Coming back on a second day is a milestone too, and the 3-day practice plan turns it into a routine.
Traders who get comfortable with this cycle sometimes move on to a paid challenge from $29, where the same terminal comes with drawdown rules and passing leads to a funded account with an 80% profit split. That model is called prop trading, and the crypto prop trading guide explains it when you are curious.
Pick a challenge and start trading
Two-step evaluation, transparent rules, profit split up to 80%.
Not sure which size fits? Read the rules · Common questions
Not set up yet? Create your free practice account, verify your phone, open Accounts from the sidebar, press Start practising and follow this page from the top on BTC/USDT.
Leveraged crypto trading can lose money quickly, and a good run on virtual funds does not predict how you will trade with real money.
Questions about your first demo trade
Do I have to set a stop loss on a demo trade?
The terminal lets you trade without one. Set it anyway, because the point of practice is to build the habit you will need when a loss costs real money.
What leverage should a beginner use?
Keep it low, around 1:2 to 1:5, while you learn. Leverage only changes the margin you lock up, so it never needs to be high to take a sensible position.
Why did my balance not move while the trade was open?
Balance changes only when a position closes. The live profit or loss of an open trade shows in equity and Unrealized PnL.
Should my first trade be a long or a short?
Either works, so follow what the chart suggests rather than a preference. Try at least one of each during your first ten trades so neither feels unfamiliar later.
Questions about the Fundex24 challenges?
Open the support chat and ask — the team replies right there.
Chat with supportPrefer to read first? Browse the FAQ · Compare the challenges
Continue your learning path
Move from this article to the next useful action or topic.